In the last posts, we covered the basic concepts of Model2 and Java Servlet class. 

This post will explore more ways and functions to build programs. 

If you want to refer to my last post, please click the link below : 

2022.09.15 - [JSP] - JSP) Model1 vs Model2

2022.09.15 - [JSP] - JSP) Model2 - Java Servlet 1


Example 1 : Log in

LoginServlet.java

This program is processed only with the post method, so we don't need to fill out the doGet method.

There are two ways to forward the Java Servlet class to the JSP page:  Dispatcher method and Redirect method. 

1. Dispatcher method

RequestDispatcher dispatcher = request.getRequestDispatcher("dispatcher.jsp"); dispatcher.forward(request, response);

2. Redirect method

response.sendRedirect("redirect.jsp");

In this code, we will use the dispatcher method, which will also work with the redirect method. In the Example 2, we will discuss more about these methods.

package login;

import java.io.IOException;
import java.io.PrintWriter;

import javax.servlet.RequestDispatcher;
import javax.servlet.ServletException;
import javax.servlet.annotation.WebServlet;
import javax.servlet.http.HttpServlet;
import javax.servlet.http.HttpServletRequest;
import javax.servlet.http.HttpServletResponse;
import javax.servlet.http.HttpSession;

/**
 * Servlet implementation class LoginServlet
 */
@WebServlet("/login")
public class LoginServlet extends HttpServlet {
	private static final long serialVersionUID = 1L;

	/**
	 * @see HttpServlet#HttpServlet()
	 */
	public LoginServlet() {
		super();
		// TODO Auto-generated constructor stub
	}

	/**
	 * @see HttpServlet#doGet(HttpServletRequest request, HttpServletResponse
	 *      response)
	 */
	protected void doGet(HttpServletRequest request, HttpServletResponse response)
			throws ServletException, IOException {
		// TODO Auto-generated method stub
	}

	/**
	 * @see HttpServlet#doPost(HttpServletRequest request, HttpServletResponse
	 *      response)
	 */
	protected void doPost(HttpServletRequest request, HttpServletResponse response)
			throws ServletException, IOException {
		// TODO Auto-generated method stub
		request.setCharacterEncoding("utf-8");
		response.setContentType("text/html;charset=utf-8");
		
		PrintWriter out = response.getWriter();  // PrintWriter object

		String id = request.getParameter("id");
		String passwd = request.getParameter("passwd");
		if (id.equals("java") && passwd.equals("java")) {
			// Session object
			HttpSession session = request.getSession();
			session.setAttribute("id", id);		
			// 1. Dispatcher method 
			RequestDispatcher dispatcher = request.getRequestDispatcher("./servlet/ex666/loginSuccess.jsp");
			dispatcher.forward(request, response);
			
			// 2. Redirect method
//			response.sendRedirect("./servlet/ex666/loginSuccess.jsp");
		} else { 
			out.println("<script>");
			out.println("alert('Incorrect ID or password.')");
			out.println("history.back()");
			out.println("</script>");
		}
	}

}

index.html

With the <frameset> and <frame> tag, we can split the browser into two parts. 

<html>
<head>
<meta charset="utf-8">
<title>Index</title>
</head>
<frameset cols="30%,*">
	<frame src="/jsppro/servlet/ex666/menu.jsp" name="leftFrame" />
	<frame src="/jsppro/servlet/ex666/login.jsp" name="rightFrame" />
</frameset>
<body>

</body>
</html>

menu.jsp

<%@ page language="java" contentType="text/html; charset=utf-8"
    pageEncoding="utf-8"%>

<html>
	<head>
	<meta charset="utf-8">
	<title>Menu</title>
	</head>
<%
	String id = (String)session.getAttribute("id");
%>
<body>
<%
	if(id == null){
%>
   <a href="login.jsp" target="rightFrame" />Log in</a>
<% 
	}
	else{
%>
	Welcome, <%=id %>!
<%
	}
%>

</body>
</html>

login.jsp

The action is connected to the annotation in LoginServlet.java.

<%@ page language="java" contentType="text/html; charset=utf-8"
    pageEncoding="utf-8"%>

<html>
	<head>
	<meta charset="utf-8">
	<title>Log in</title>
	</head>
	<body>
	<form action="/jsppro/login" method="post">
		ID : <input type="text" name="id"/>
		Password : <input type="password" name="passwd"/><br>
		<input type="submit" value="login"/>
	</form>
</body>
</html>

loginSuccess.jsp

<%@ page language="java" contentType="text/html; charset=utf-8"
    pageEncoding="utf-8"%>

<html>
	<head>
	<meta charset="utf-8">
	<title>Log in success</title>
	<script>
	top.leftFrame.location.href="/jsppro/servlet/ex666/menu.jsp";
	</script>
	</head>
	<body>
		Successfully logged in.
	</body>
</html>

You will see this result if you insert ID- java / Password-java. 

Example 2

In this example, we will learn more specifically about two methods for forwarding: Dispatcher method and Redirect method. With these example codes, compare each method.

redirect.jsp

<%@ page language="java" contentType="text/html; charset=utf-8"
    pageEncoding="utf-8"%>

<html>
	<head>
	<meta charset="utf-8">
	<title>Insert title here</title>
	</head>
	<body>
	request Attribute value : <%=request.getAttribute("request") %>
	</body>
</html>

RedirectServlet.java

package send;

import java.io.IOException;
import javax.servlet.ServletException;
import javax.servlet.annotation.WebServlet;
import javax.servlet.http.HttpServlet;
import javax.servlet.http.HttpServletRequest;
import javax.servlet.http.HttpServletResponse;

/**
 * Servlet implementation class RedirectServlet
 */
@WebServlet("/RedirectServlet")
public class RedirectServlet extends HttpServlet {
	private static final long serialVersionUID = 1L;
       
    /**
     * @see HttpServlet#HttpServlet()
     */
    public RedirectServlet() {
        super();
        // TODO Auto-generated constructor stub
    }

	/**
	 * @see HttpServlet#doGet(HttpServletRequest request, HttpServletResponse response)
	 */
	protected void doGet(HttpServletRequest request, HttpServletResponse response) throws ServletException, IOException {
		// TODO Auto-generated method stub

		request.setAttribute("request", "requestValue");
		response.sendRedirect("./servlet/ex777/redirect.jsp"); // forwarding 
	}

}

dispatcher.jsp

<%@ page language="java" contentType="text/html; charset=utf-8"
    pageEncoding="utf-8"%>

<html>
	<head>
	<meta charset="utf-8">
	<title>Insert title here</title>
	</head>
	<body>
	request Attribute value : <%=request.getAttribute("request") %>
	</body>
</html>

DispatcherServlet.java

package send;

import java.io.IOException;

import javax.servlet.RequestDispatcher;
import javax.servlet.ServletException;
import javax.servlet.annotation.WebServlet;
import javax.servlet.http.HttpServlet;
import javax.servlet.http.HttpServletRequest;
import javax.servlet.http.HttpServletResponse;

/**
 * Servlet implementation class DispatcherServlet
 */
@WebServlet("/DispatcherServlet")
public class DispatcherServlet extends HttpServlet {
	private static final long serialVersionUID = 1L;
       
    /**
     * @see HttpServlet#HttpServlet()
     */
    public DispatcherServlet() {
        super();
        // TODO Auto-generated constructor stub
    }

	/**
	 * @see HttpServlet#doGet(HttpServletRequest request, HttpServletResponse response)
	 */
	protected void doGet(HttpServletRequest request, HttpServletResponse response) throws ServletException, IOException {
		// TODO Auto-generated method stub 
		
		request.setAttribute("request","requestValue"); 
		
		RequestDispatcher dispatcher = 
				request.getRequestDispatcher("./servlet/ex777/dispatcher.jsp");
		dispatcher.forward(request, response);
	}

}


In the last post, we talked about the difference between Model1 and Model2. 

To know more about Model2, we need to know Java Servlet, EL(Expression Language), and JSTL(JSP Standard Tag Library). First, let us discuss about Java Servlet Class.


Java Servlet Class
Java Servlet Class means all the web programs that is written in Java language. This class can include the HTML, and JavaScript codes and it can print out the codes on the web browser right away. 


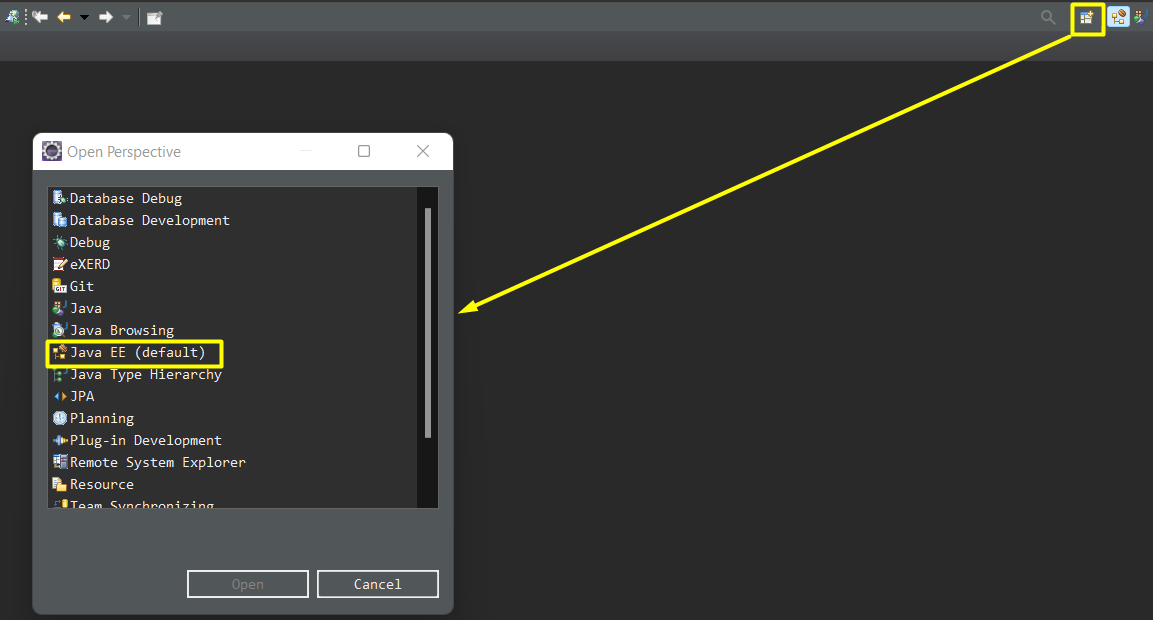
To create the Java Servlet Class in Eclipse, Java EE has to be selected as a perspective. 

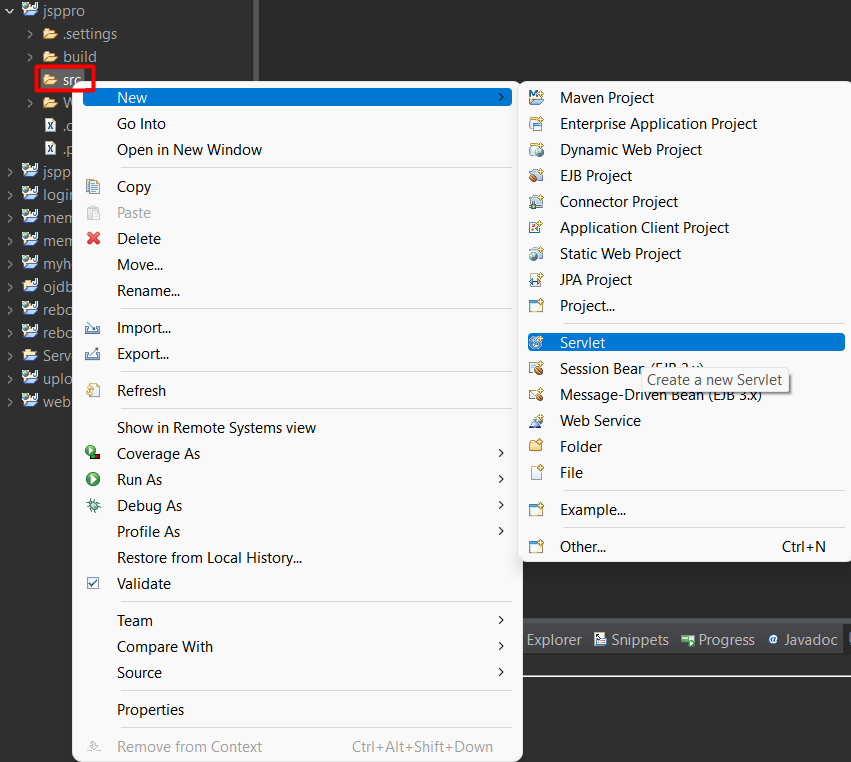
In the new dynamic web project, in the src folder, create a new Servlet. 

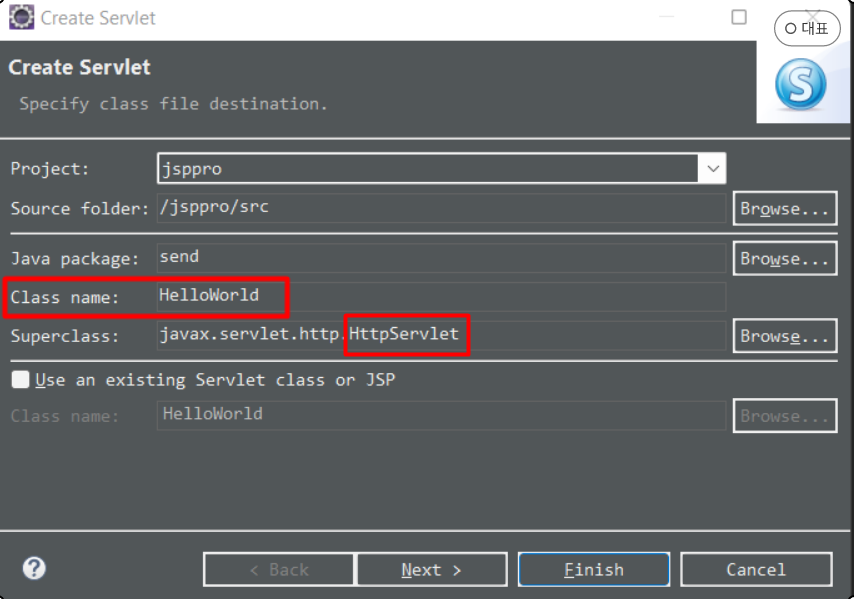
The class name and the file name will be the same. As you can see, its superclass is automatically designated as the HttpServlet class, so this class will be inherited as extends.

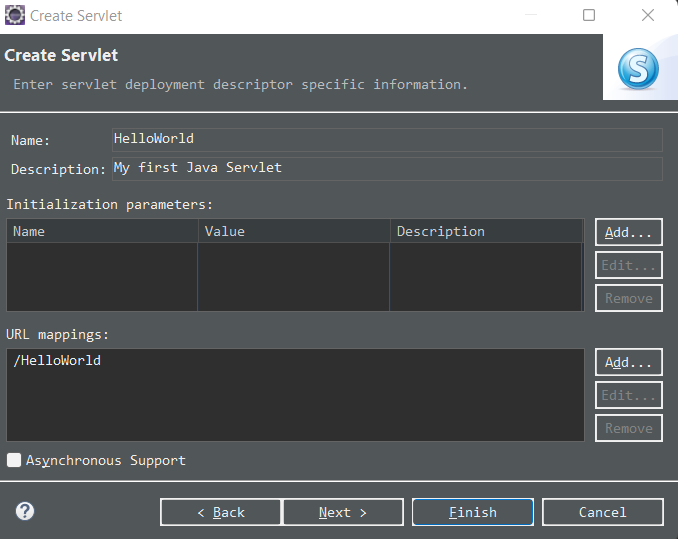
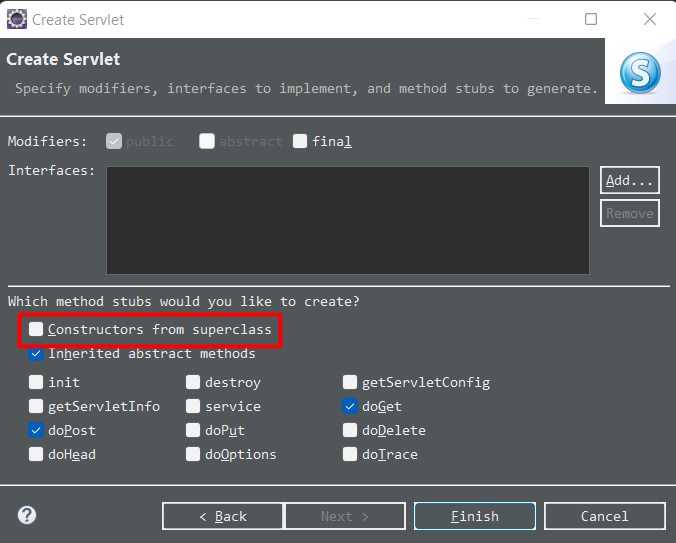
Since we don't need any constructors, we are ticking out the box, and we will leave others as they are. 

Then, you will see this codes with doGet method and doPost method, as we checked the box.

package send;

import java.io.IOException;
import javax.servlet.ServletException;
import javax.servlet.annotation.WebServlet;
import javax.servlet.http.HttpServlet;
import javax.servlet.http.HttpServletRequest;
import javax.servlet.http.HttpServletResponse;

/**
 * Servlet implementation class HelloWorld
 */
@WebServlet(description = "My first Java Servlet", urlPatterns = { "/HelloWorld" })
public class HelloWorld extends HttpServlet {
	private static final long serialVersionUID = 1L;

	/**
	 * @see HttpServlet#doGet(HttpServletRequest request, HttpServletResponse response)
	 */
	protected void doGet(HttpServletRequest request, HttpServletResponse response) throws ServletException, IOException {
		// TODO Auto-generated method stub
		response.getWriter().append("Served at: ").append(request.getContextPath());
	}

	/**
	 * @see HttpServlet#doPost(HttpServletRequest request, HttpServletResponse response)
	 */
	protected void doPost(HttpServletRequest request, HttpServletResponse response) throws ServletException, IOException {
		// TODO Auto-generated method stub
		doGet(request, response);
	}

}

When you fun the code, you will see this on the browser. 

Here, this is called Annotation.

Let us change the code a bit.

package send;

import java.io.IOException;
import java.io.PrintWriter;

import javax.servlet.ServletException;
import javax.servlet.annotation.WebServlet;
import javax.servlet.http.HttpServlet;
import javax.servlet.http.HttpServletRequest;
import javax.servlet.http.HttpServletResponse;

/**
 * Servlet implementation class HelloWorld
 */
@WebServlet(description = "My first Java Servlet", urlPatterns = { "/HelloWorld" })
public class HelloWorld extends HttpServlet {
	private static final long serialVersionUID = 1L;

	/**
	 * @see HttpServlet#doGet(HttpServletRequest request, HttpServletResponse response)
	 */
	protected void doGet(HttpServletRequest request, HttpServletResponse response) throws ServletException, IOException {
		// TODO Auto-generated method stub
		
		response.setContentType("text/html;charset=utf-8");
        PrintWriter out = response.getWriter();
        out.println("<html>");
        out.println("<head>");
        out.println("<title>Hello World!</title>");
        out.println("</head>");
        out.println("<body>");
        out.println("<h1>Hi there!!</h1>");
        out.println("</body>");
        out.println("</html>");
	}

	/**
	 * @see HttpServlet#doPost(HttpServletRequest request, HttpServletResponse response)
	 */
	protected void doPost(HttpServletRequest request, HttpServletResponse response) throws ServletException, IOException {
		// TODO Auto-generated method stub
		doGet(request, response);
	}

}

 Before running the code, if there are other files with the same annotation, you need to close them to run this well. 

To encode, in the jsp files, we used the contentType and the charset, whereas, in this servlet class, we use setContentType.

response.setContentType("text/html;charset=utf-8");


For better understanding, this time, let us make another servlet class with HTML file. 


Example 1


Method.java

doPost class is connected to the Call with get method, and the doGet class is connected to the Call with post method.

package send;

import java.io.IOException;
import java.io.PrintWriter;

import javax.servlet.ServletException;
import javax.servlet.annotation.WebServlet;
import javax.servlet.http.HttpServlet;
import javax.servlet.http.HttpServletRequest;
import javax.servlet.http.HttpServletResponse;

/**
 * Servlet implementation class Method
 */
@WebServlet("/Method")
public class Method extends HttpServlet {
	private static final long serialVersionUID = 1L;

	/**
	 * @see HttpServlet#doGet(HttpServletRequest request, HttpServletResponse response)
	 */
	protected void doGet(HttpServletRequest request, HttpServletResponse response) throws ServletException, IOException {
		// TODO Auto-generated method stub
		response.setContentType("text/html;charset=UTF-8");
		PrintWriter out = response.getWriter();
		out.println("<h1>Processed with a get method.</h1>");
	}

	/**
	 * @see HttpServlet#doPost(HttpServletRequest request, HttpServletResponse response)
	 */
	protected void doPost(HttpServletRequest request, HttpServletResponse response) throws ServletException, IOException {
		// TODO Auto-generated method stub
		response.setContentType("text/html;charset=UTF-8");
		PrintWriter out = response.getWriter();
		out.println("<h1>Processed with a post method.</h1>");
	}

}

Method.html

The action has to correspond to the annotation(@) in the servlet class.

<html lang="en">
<head>
	<meta charset="utf-8">
</head>
<body>
	<!-- action = "/Project name/Servlet file name"  
		No package name needed.
	-->
	<form method="get" action="/jsppro/Method">
		<input type="submit" value="Called with get method">
	</form>

	<form method="post" action="/jsppro/Method">
		<input type="submit" value="Called with post method">
	</form>
</body>
</html>


Example 2


Let us exercise more with a little bit more complicated example. 

QueryString.html

<html lang="en">
 <head>
  <meta charset="utf-8">
 </head>
 <body>

<form method="get" action="/jsppro/QueryString">
ID : <input type="text" name="id"  size="20"> <br>
Password : <input type="password" name="pw"  size="20"> <br>
Name : <input type="text" name="name"  size="20"> <br>
Group : <input type="radio" name="group"  value="member"> Member
           <input type="radio" name="group"  value="Manager"> Manager<br>
Phone : <select name="phone1">
                 <option value="010" selected> 010 </option>    
                 <option value="011"> 011 </option>    
                 <option value="016"> 016 </option> 
                 <option value="017"> 017 </option>    
                 <option value="018"> 018 </option>    
                 <option value="019"> 019 </option>
           </select>              
    -      <input type="text" name="phone2" size="4" maxlangth="4">
    -
			<input type="text" name="phone3" size="4" maxlangth="4"><br>
			<input type="submit" value="Sumbit">
		</form>
	</body>
</html>

QueryString.java

package send;

import java.io.IOException;
import java.io.PrintWriter;

import javax.servlet.ServletException;
import javax.servlet.annotation.WebServlet;
import javax.servlet.http.HttpServlet;
import javax.servlet.http.HttpServletRequest;
import javax.servlet.http.HttpServletResponse;

/**
 * Servlet implementation class QueryString
 */
@WebServlet(description = "Exercise", urlPatterns = { "/QueryString" })
public class QueryString extends HttpServlet {
	private static final long serialVersionUID = 1L;

	/**
	 * @see HttpServlet#doGet(HttpServletRequest request, HttpServletResponse
	 *      response)
	 */
	protected void doGet(HttpServletRequest request, HttpServletResponse response)
			throws ServletException, IOException {
		// TODO Auto-generated method stub

		response.setContentType("text/html;charset=utf-8");

		PrintWriter out = response.getWriter();
		String id = "", name = "", vclass = "", phone1 = "", phone2 = "", phone3 = "";
		id = request.getParameter("id");
		name = request.getParameter("name");
		vclass = request.getParameter("group");
		phone1 = request.getParameter("phone1");
		phone2 = request.getParameter("phone2");
		phone3 = request.getParameter("phone3");
		
		out.println("<html><head></head><body>");
		out.println("The data that you inserted is processed with [GET method].<br> ID : <b>");
		out.println(id);
		out.println("</b><br> Name : <b>");
		out.println(name);
		out.println("</b><br> Group : <b>");
		out.println(vclass);
		out.println("</b><br> Phone : <b>");
		out.println(phone1);
		out.println("-");
		out.println(phone2);
		out.println("-");
		out.println(phone3);
		out.println("</b><br><a href='javascript:history.go(-1)'>Go back</a>");
		out.println("</body></html>");
		out.close();
	}

	/**
	 * @see HttpServlet#doPost(HttpServletRequest request, HttpServletResponse
	 *      response)
	 */
	protected void doPost(HttpServletRequest request, HttpServletResponse response)
			throws ServletException, IOException {
		// TODO Auto-generated method stub
		
		response.setContentType("text/html;charset=utf-8");

		request.setCharacterEncoding("utf-8");
		
		PrintWriter out = response.getWriter();
		String id = "", name = "", vclass = "", phone1 = "", phone2 = "", phone3 = "";
		id = request.getParameter("id");
		name = request.getParameter("name");
		vclass = request.getParameter("group");
		phone1 = request.getParameter("phone1");
		phone2 = request.getParameter("phone2");
		phone3 = request.getParameter("phone3");
		
		out.println("<html><head></head><body>");
		out.println("The data that you inserted is processed with [POST method].<br> ID : <b>");
		out.println(id);
		out.println("</b><br> Name : <b>");
		out.println(name);
		out.println("</b><br> Group : <b>");
		out.println(vclass);
		out.println("</b><br> Phone : <b>");
		out.println(phone1);
		out.println("-");
		out.println(phone2);
		out.println("-");
		out.println(phone3);
		out.println("</b><br><a href='javascript:history.go(-1)'>Go back</a>");
		out.println("</body></html>");
		out.close();
	}

}

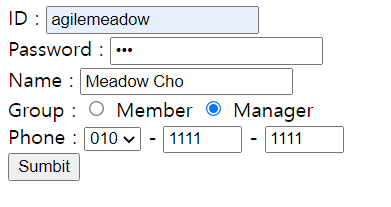
If you change the method from "get" to "post" it will change like this below.

Now, we will add the DTO and DAO classes. We also have to edit a little bit of QueryString.java.

We add this(below) is in the doPost class,

String pw = "";

this(below) to connect to the DTO and DAO.

QueryDTO query = new QueryDTO();
query.setId(id);
query.setPw(pw);
query.setName(name);
query.setVclass(vclass);
query.setPhone(phone1+"-"+phone2+"-"+phone3);
		
QueryDAO dao = QueryDAO.getInstance();
dao.insert(query);		//Sign up


QueryDTO.java

package send;

public class QueryDTO {

	private String id;
	private String pw;
	private String name;
	private String vclass;
	private String phone;
	
	public String getId() {
		return id;
	}
	public void setId(String id) {
		this.id = id;
	}
	public String getPw() {
		return pw;
	}
	public void setPw(String pw) {
		this.pw = pw;
	}
	public String getName() {
		return name;
	}
	public void setName(String name) {
		this.name = name;
	}
	public String getVclass() {
		return vclass;
	}
	public void setVclass(String vclass) {
		this.vclass = vclass;
	}
	public String getPhone() {
		return phone;
	}
	public void setPhone(String phone) {
		this.phone = phone;
	}
	
}

QueryDAO.java

package send;

import java.sql.Connection;
import java.sql.DriverManager;
import java.sql.PreparedStatement;

public class QueryDAO {

	private static QueryDAO instance = new QueryDAO();
	
	public static QueryDAO getInstance(){
		return instance;
	}
	
	public void insert(QueryDTO dto){
		Connection conn = null;
		PreparedStatement pstmt = null;
		String url = "jdbc:oracle:thin:@localhost:1521:xe";
		String sql="";
		
		try{
			Class.forName("oracle.jdbc.driver.OracleDriver");
			conn = DriverManager.getConnection(url,"totoro","totoro123");
			
			sql="insert into query values(?,?,?,?,?)";
			pstmt = conn.prepareStatement(sql);
			pstmt.setString(1, dto.getId());
			pstmt.setString(2, dto.getPw());
			pstmt.setString(3, dto.getName());
			pstmt.setString(4, dto.getVclass());
			pstmt.setString(5, dto.getPhone());
			pstmt.executeUpdate();		
			
		}catch(Exception e){
			
		}finally{
			if(pstmt != null){
				try{
					pstmt.close();
				}catch(Exception e){					
				}
			}
			if(conn != null){
				try{
					conn.close();
				}catch(Exception e){					
				}
			}			
		}
		
	}
	
}

Now, we will create a table on Oracle to connect the database and save the data. 

create table query(
		id varchar2(20),
		pw varchar2(20),
		name varchar2(20),
		vclass varchar2(20),
		phone varchar2(30));


Checkboxes

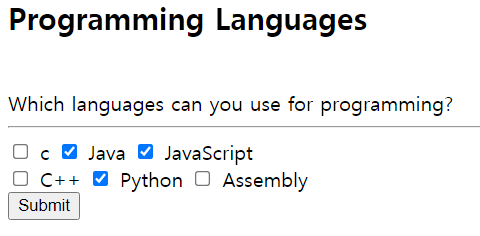
Here is an example of dealing with the checkboxes in the servlet.

multiPara.html

<html lang="en">
 <head>
  <meta charset="UTF-8">
</head>
<body>
<form method="post" action="/jsppro/multiPara">
<h2>Programming Languages</h2><br>
Which languages can you use for programming?<br>
<hr>
 <input type="checkbox" name="plang" value="C"> c
 <input type="checkbox" name="plang" value="Java"> Java
 <input type="checkbox" name="plang" value="JavaScript"> JavaScript<br>
 <input type="checkbox" name="plang" value="C++"> C++
 <input type="checkbox" name="plang" value="Python"> Python
 <input type="checkbox" name="plang" value="Assembly"> Assembly<br>  
 <input type="submit" value="Submit"> 
</form>
</body>
</html>

multiPara.java

Since the "post" method is requested, it will be processed in the doPost method.

package send;

import java.io.IOException;
import java.io.PrintWriter;

import javax.servlet.ServletException;
import javax.servlet.annotation.WebServlet;
import javax.servlet.http.HttpServlet;
import javax.servlet.http.HttpServletRequest;
import javax.servlet.http.HttpServletResponse;

/**
 * Servlet implementation class multiPara
 */
@WebServlet(description = "Exercise", urlPatterns = { "/multiPara" })
public class multiPara extends HttpServlet {
	private static final long serialVersionUID = 1L;

	/**
	 * @see HttpServlet#doGet(HttpServletRequest request, HttpServletResponse
	 *      response)
	 */
	protected void doGet(HttpServletRequest request, HttpServletResponse response)
			throws ServletException, IOException {
		// TODO Auto-generated method stub
		response.setContentType("text/html;charset=UTF-8");
		PrintWriter out = response.getWriter();
		String[] item;

		item = request.getParameterValues("plang");
		out.println("Selected languages are");
		
		try {
			for (int i = 0; i < item.length; i++)
				out.println(" : " + item[i]);
//				out.println(" : " + HanConv.toKor(item[i]));
		} catch (Exception e) {
			out.println(" nothing.");
		}
	}

	/**
	 * @see HttpServlet#doPost(HttpServletRequest request, HttpServletResponse
	 *      response)
	 */
	protected void doPost(HttpServletRequest request, HttpServletResponse response)
			throws ServletException, IOException {
		// TODO Auto-generated method stub
		response.setContentType("text/html;charset=UTF-8");
		
		request.setCharacterEncoding("UTF-8");
		
		PrintWriter out = response.getWriter();
		String[] item;

		item = request.getParameterValues("plang");
		out.println("Selected languages are");
		
		try {
			for (int i = 0; i < item.length; i++)
				out.println(" : " + item[i]);
//				out.println(" : " + HanConv.toKor(item[i]));

		} catch (Exception e) {
			out.println(" nothing.");
		}
	}

}


'Java > JSP' 카테고리의 다른 글

JSP) JSTL (JSP Standard Tag Library) - Basic / Core tags  (0) 2022.09.17
JSP) EL(Expression Language)  (0) 2022.09.16
JSP) Model1 vs Model2  (0) 2022.09.15
JSP) JSP and Oracle  (0) 2022.08.31
JSP) JavaBean  (0) 2022.08.31

So far, in JSP, what we do was Model1, and in this post, we will explore Model2.

The biggest difference between Model1 and Model2 is whether there is Servlet(Controller class) or not. 

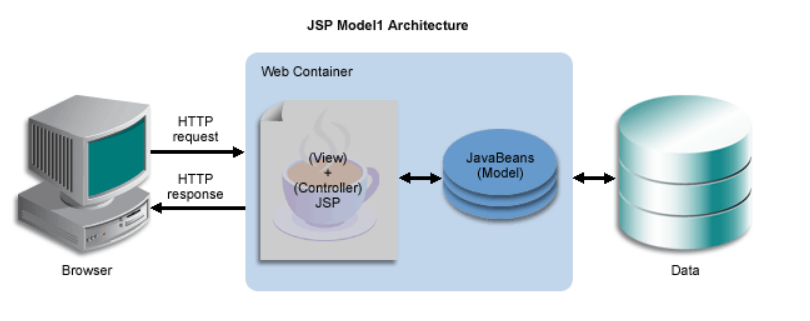
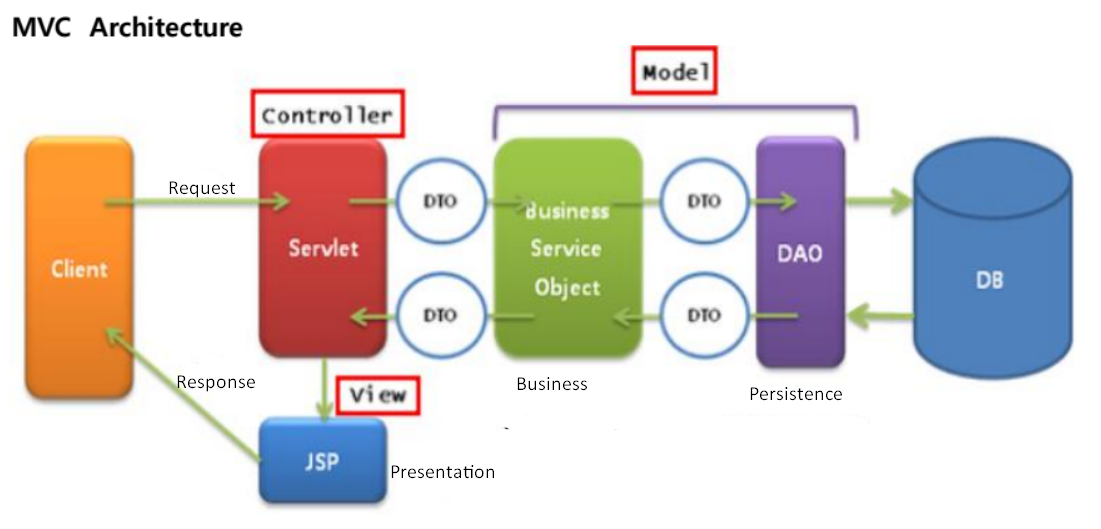
Here are the architectures of each model. 

Source: Oracle
Source: Oracle

In Model1, we use only JSP, JSP, or Java Bean. It is relatively easy to learn and fast to develop. 

However, it can be confusing on the JSP page since the presentation, and business logic are on one page. For this reason, it is sometimes hard to separate the developer's and the designer's work. 


On the other hand, Model2 separates the roles of the application into model, view, and controller. It is certainly easy to maintain and expand the service and split the responsibility of each developer and the designer. However, as it is better arranged than Model1, the projects often take longer. Moreover, the programmers must understand the MVC(Model-View-Controller) structure. 


So, what is MVC? 

MVC is a development methodology that separates the application into three parts: Model, View, and Controller. 

Model process the application's data by using the service and DAO class. View process the user interface, normally designers develop this part, consisting of EL(Expression Language) and JSTL(JSP Standard Tag Library). The controller adjusts the flow between the Model and View with the Java Servlet. 

To know better about the MVC patterns, we first need to study Java Servlet, EL(Expression Language), and JSTL(JSP Standard Tag Library) and in the next posts, we will study more about them.

'Java > JSP' 카테고리의 다른 글

JSP) EL(Expression Language)  (0) 2022.09.16
JSP) Model2 - Java Servlet 1  (0) 2022.09.15
JSP) JSP and Oracle  (0) 2022.08.31
JSP) JavaBean  (0) 2022.08.31
JSP) Action tags - include  (0) 2022.08.31

This is how to delete the files in the directory and the directories with or without files. 

import java.io.File;

public class FileTest {

	public static void main(String[] args) {

		try {
			File temp = new File("C:/java01", "temp");
			File tempFile = new File("test"); // Relative path
			temp.mkdirs();
			tempFile.mkdirs();

			File[] f = tempFile.listFiles();
			for (int i = 0; i < f.length; i++) {
				System.out.println(f[i].getName());
				f[i].delete(); // To delete all files in the directory
			}
			tempFile.delete(); // To delete the empty directory

//To delete a child directory
			temp.delete(); 

//To delete a parent directory
			temp.getParentFile().delete();

		} catch (Exception e) {
		}
	}
}

'Java' 카테고리의 다른 글

Java) Array  (0) 2022.09.04
Java) .length vs length()  (0) 2022.09.02
Java) Conditional statements and loops  (0) 2022.08.30
Java) Data Types  (0) 2022.08.27
Java) Operators  (0) 2022.08.26

This lecture note is about Expressing and Analyzing Algorithms.

Please refer to the first lecture note below :

2022.09.08 - [CS Knowledge] - [UPenn] Computational Thinking for Problem Solving

Source: Penn Engineering


Linear Search and Binary Search

This work is making a bunch of comparisons, called 'Linear Search' with linear complexity, which cannot be the most efficient way to bring the outcome.

In linear search, we start with the first item and look at the next one, whereas in 'Binary Search', we start comparing the value in the middle of the list to the target, and if they are equal, then we have found the target and can stop looking. If the value in the middle of the list is greater than the target, remove the middle element and elements that are larger than it and repeat. If the value in the middle of the list is less than the target, remove the middle element and elements that are smaller than it and repeat. By using this method, we can save more time and spend fewer comparisons to get to the target. (Penn Engineering)

It is somehow better than the linear search. However, the binary search has logarithmic complexity, meaning that if we double the input size, the number of operations only increases by one.

There are two different algorithms.


Brute Force Algorithms

Brute force algorithms can be used for solving optimization problems.
• Try all possible solutions
• Identify the ones that solve the problem
• Determine the best one


Greedy Algorithms

Do the thing that seems best at the time
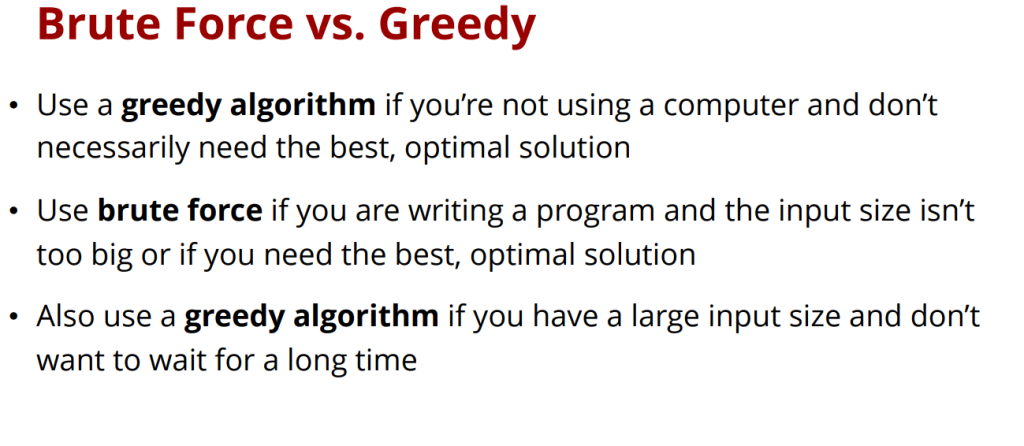
• Brute force: consider all possible solutions and choose the best one. It is optimized but cannot be the quickest.
• Greedy: make a decision that seems best right now and keep repeating
it until done. It is quick but cannot be optimized.


Source: Penn Engineering


The difference between Greedy and Brute force is whether to look through every possible solution or not. Each algorithm has pros and cons, so it is essential to use each in a good situation.

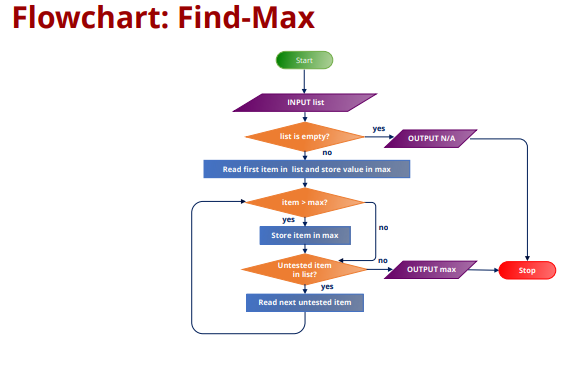
Moreover, depending on the case, all types of algorithms can be used in one flowchart.

'CS Knowledge' 카테고리의 다른 글

[UPenn] Computational Thinking for Problem Solving  (0) 2022.09.08
Fetch! Decode! Execute!  (0) 2022.09.07
Network: IP address and DNS  (0) 2022.09.05

In terms of SQL, you can work on the command prompt in other applications like Eclipse. In this post, we are going to look at working with Eclipse.


1. Copy the JDBC Driver file for Oracle to the Java installation location (C:\Program Files\Java\jre1.8.0_211\lib\ext). C:\oraclexe\app\oracle\product\11.2.0\server\jdbc\lib\ojdbc6.jar file

2.Copy to C:\Program Files\Java\jre1.8.0_211\lib\ext

3. Set up Oracle Database Integration in Eclipse
From the Project Explorer screen in Eclipse, you can view the JRE System Library
Right click - Properties - Installed JRE button click
jre8 Select and click the Edit button - Click the Add External JAR button
C:\Program Files\Java\jre8\lib\ext\ojdbc6.jar file

4. Re-drive the Eclipse

5. Create a simple Java-Oracle file and test it.

import java.sql.*;

   public class JDBC_Connect02{
   public static void main(String[] args)  {

   /** ORACLE JDBC Driver Test *****************************************/
	String driver = "oracle.jdbc.driver.OracleDriver"; 
	String url = "jdbc:oracle:thin:@127.0.0.1:1521:orcl";
   /*******************************************************************/

   /** My-SQL JDBC Driver *********************************************/
   //	String driver ="com.mysql.jdbc.Driver";
   //	String url = "jdbc:mysql://localhost/academy";
   /*******************************************************************/

       Connection con = null;

       try{

         Class.forName(driver);

   /**   ORACLE에서 Connection 객체 ***********************************/
          con = DriverManager.getConnection(url, "scott", "tiger" );
   /*******************************************************************/


   /**   My-SQL에서 Connection 객체 ***********************************/
   //	  con = DriverManager.getConnection(url, "totoro", "1234" );
   /*******************************************************************/

         System.out.println("Database connection success.");

       } catch(Exception e){
	    	   System.out.println("Database connection failed.");
		   e.printStackTrace();
       } finally{
		try{
		     if( con != null )        
                     con.close();
		   } catch(Exception e){
			System.out.println( e.getMessage( ));  
                                }
      }
    }
  }  

6. If the database connection failure message appears,
C:\oracle\product\11.2.0\db_1\NETWORK\ADMIN folder listener.ora
tnsnames.ora Check the file Host= computer name, Port=1521, etc.


Setting on Eclipse

1.window - show view - others - Data Management File - Data Source Explorer -> Open
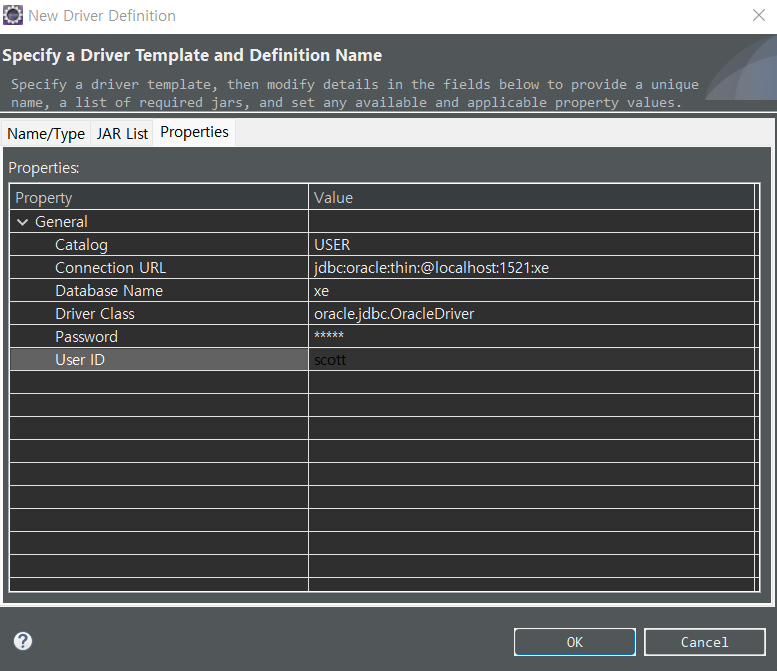
2.Database Connections - Right click - New - Oracle - (Insert like attached) - save password - "ping succeed"

To create SQL file (Connection has to be on)

  1. Create SQL package
  2. New - others - SQL Development - SQL File - write a file name
  3. Connection profile

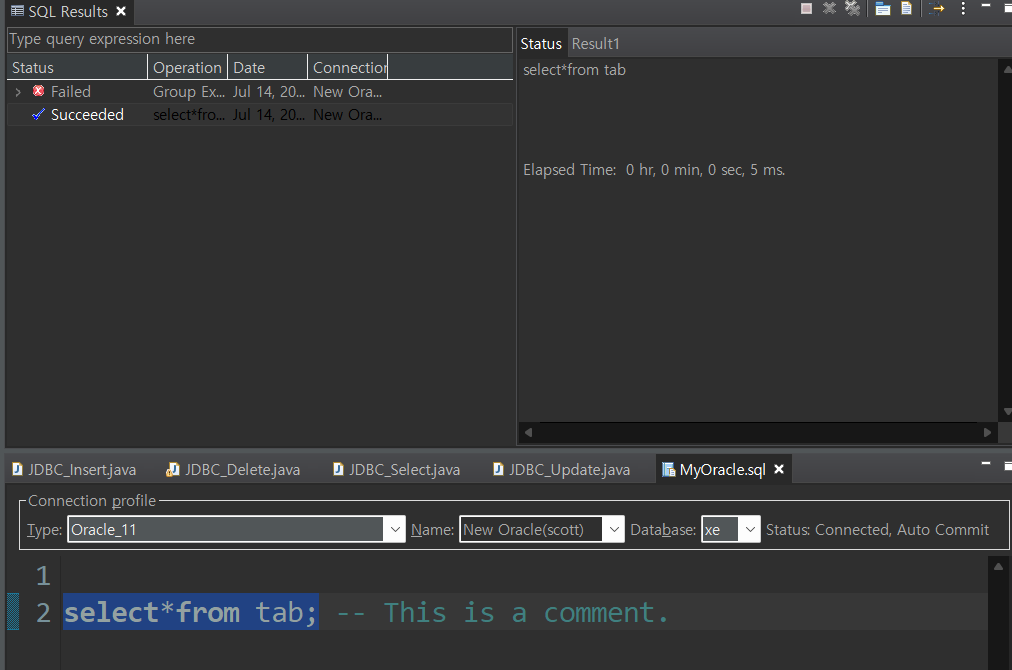
4.enter 'select * from tab;' block -> Alt + X to execute *To comment out : --

5. To create the table, write "

create table customer( no number(4) primary key,
name varchar2(20),
email varchar2(20),
tel varchar2(20) );

"

6. Again, block 'select * from tab;' -> Alt + x, and you will see this table.

'DB > Oracle' 카테고리의 다른 글

Oracle) Reserved words  (0) 2022.10.25
Oracle) Structured Query Language(SQL)  (0) 2022.09.03
Oracle) Setting up  (0) 2022.09.01

First flowchart

Second Flowchart

It looks very complicated and lacks visual attraction, but I tried and learned at least!

Third Flowchart after Feedback

Help: Omar Shalaby


After realizing "Think twice, Code once" is important, these are my first flow charts. I thought three times and coded twice, but it helped me to understand how my algorithms have to be.


First Code

import java.util.Scanner;

//Temperature Converter Far -> Cel / Cel -> Far
public class TempConverter {

	public static void main(String[] args) {
		// TODO Auto-generated method stub

		String num1;
		int tem, press;
		double num2, num3;
		// boolean tof = false;
		Scanner sc = new Scanner(System.in);

		System.out.println("Press 1 to convert Fahrenheit to Celsius, Press 2 to convert from Celsius to Fahrenheit. ");
		press = sc.nextInt();
		// while (true) {
		try {

			while (true) {
				if (press == 1) {
					System.out.println("Enter Fahrenheit.");
					sc.nextLine();// The "Enter" key after inputting the number is considered as one input.
					// By inserting this line, you can avoid the output of "Not a number" right
					// away.
					num1 = sc.nextLine();

					// while (true) {
					try {
						num2 = Double.parseDouble(num1);
						// To check if int is inserted or not.

						// formula: (32°F − 32) × 5/9 = 0°C
						num3 = ((((num2 - 32.0) * 5.0) / 9.0));
						System.out.printf("%.2f", num3);
						System.out.println();
						return;

					} catch (NumberFormatException n) {
						System.out.println("Not a number. Please enter again.");
						sc.nextLine();
					}
				} else if (press == 2) {
					System.out.println("Enter Celsius.");
					sc.nextLine();
					num1 = sc.nextLine();

					try {
						num2 = Double.parseDouble(num1);
						// To check if int is inserted or not.

						// (0°C × 9/5) + 32 = 32°F
						num3 = (((num2 * 9) / 5) + 32);
						System.out.printf("%.2f", num3);
						System.out.println();

					} catch (NumberFormatException nn) {
						System.out.println("Not a number.");

					}
				}
			}
		} catch (Exception e) {
			System.out.println("Invalid Access. Please enter again.");

		}

		// }

	}
}

Second Code(Final)

import java.io.BufferedReader;
import java.io.InputStreamReader;

public class TempConverter2 {

	public static void main(String[] args) {
		// TODO Auto-generated method stub
		try {
			System.out.println("From Fahrenheit to Celsius press 1, vice versa, press 2.");
			BufferedReader br = new BufferedReader(new InputStreamReader(System.in));
			String inputString = br.readLine();
			int num = Integer.parseInt(inputString);

			if (num == 1) {
				farToCel();
			} else if (num == 2) {
				celToFar();
			} else {
				System.out.println("Not a valid access.");
			} 

		} catch (Exception eo) {
			System.out.println("Not a number.");
		}
	}

	public static void farToCel() {
		while (true) {
			try {
				BufferedReader br = new BufferedReader(new InputStreamReader(System.in));
				System.out.println("Please enter number.");
				String inputString = br.readLine();
				double far = Double.parseDouble(inputString);
				double result1 = ((((far - 32.0) * 5.0) / 9.0));

				System.out.printf("%.2f", result1);
				System.out.println();
				System.out.println("To repeat press anything, to finish, press F or f.");
				String inputString2 = br.readLine();
				if (inputString2.equals("F") || inputString2.equals("f")) {
					System.out.println("Finish the program.");
					break; // to go back to the main menu
				} else {
					continue;
				}
			} catch (Exception e) {
				System.out.println("Not a number.");
			}

		}
	}

	public static void celToFar() {
		while (true) {
			try {
				BufferedReader br = new BufferedReader(new InputStreamReader(System.in));
				System.out.println("Please enter number.");
				String inputString = br.readLine();
				double cel = Double.parseDouble(inputString);
				double result2 = (((cel * 9) / 5) + 32);

				System.out.printf("%.2f", result2);
				System.out.println();
				System.out.println("To go repeat press anything, to finish, press F or f.");
				String inputString3 = br.readLine();
				if (inputString3.equals("F") || inputString3.equals("f")) {
					System.out.println("Finish the program.");
					break;
				} else {
					continue;
				}
			} catch (Exception ei) {
				System.out.println("Not a number.");
			}

		}
	}
}


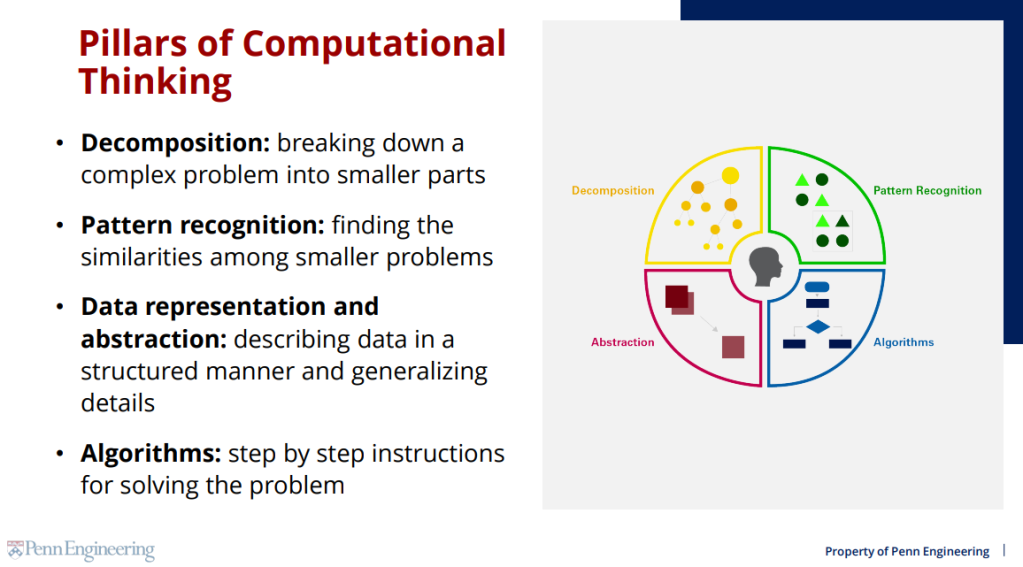
Learning Computer Science and Coding after many years of working in the Social Science and Language field makes me feel that I need to think differently when studying coding. Thus, I chose to take this course, which was very intriguing from the beginning since I can apply this way of thinking not only when I work on Coding but also in so many ways, from relatively small decisions in daily life to problem-solving situations in other fields. I am very much excited to take this course to expand my way of thinking and enhance my design of Algorithms.

Source: Penn Engineering


Decomposition
• Breaking a complex problem into more manageable sub-problems.
• Putting the solutions to the subproblems together gives a solution to the original, complex problem.

Pattern Recognition
Finding similarities or shared characteristics within or between problems.
• Makes the problem easier to solve since the same solution can be used for each occurrence of the pattern.

Data Representation & Abstraction
Determining what characteristics of the problem are important and filtering out those that are not.
• Use these to create a representation of what we are
trying to solve.

Algorithms
Step-by-step instructions on how to solve a problem.
• Identifies what is to be done (the instructions) and the order in which they should be done.


I learned from this lecture that a computational way of thinking is not only for a coding or IT-related field of studies or work but for any situation, studies, or work in our life. That is cool, isn't it?


You can also start this course on Coursera right now!

https://www.coursera.org/learn/computational-thinking-problem-solving


Computational Thinking for Problem Solving

Offered by 펜실베이니아 대학교. Computational thinking is the process of approaching a problem in a systematic manner and creating and expressing a ... 무료로 등록하십시오.

www.coursera.org


'CS Knowledge' 카테고리의 다른 글

[UPenn] Expressing and Analyzing Algorithms  (0) 2022.09.12
Fetch! Decode! Execute!  (0) 2022.09.07
Network: IP address and DNS  (0) 2022.09.05

Currently, I am studying in a coding school selected as one of the government scholarship students. During the course, I learned a lot by studying consistently! It is a very challenging time, but I am more energized every time by having more curiosity and solving the questions. 


Recently, I became more interested in Computer Science knowledge since coding is related to writing efficient lines and computational thinking and having CS-related knowledge to utilize. I will keep updating if I find cool videos or information to share:)


In this post, I am introducing a video about "How computer works." 

https://youtu.be/Z5JC9Ve1sfI

Source: Tom Scott Youtube video

It is a beneficial video for me as a beginner in the Computer Science field. I could easily understand how the CPU works just by THREE WORDS: Fetch! Decode! and Execute!


Also, have you heard of the language "Assembly"?

It is a low-level programming language that is very different from what we learn nowadays. Personally thinking, it is a very complicating language since it looks farther from a human language.

https://en.wikipedia.org/wiki/Assembly_language


Assembly language - Wikipedia

From Wikipedia, the free encyclopedia Jump to navigation Jump to search Low-level programming language In computer programming, assembly language (or assembler language,[1] or symbolic machine code[2][3][4]), often referred to simply as Assembly and common

en.wikipedia.org

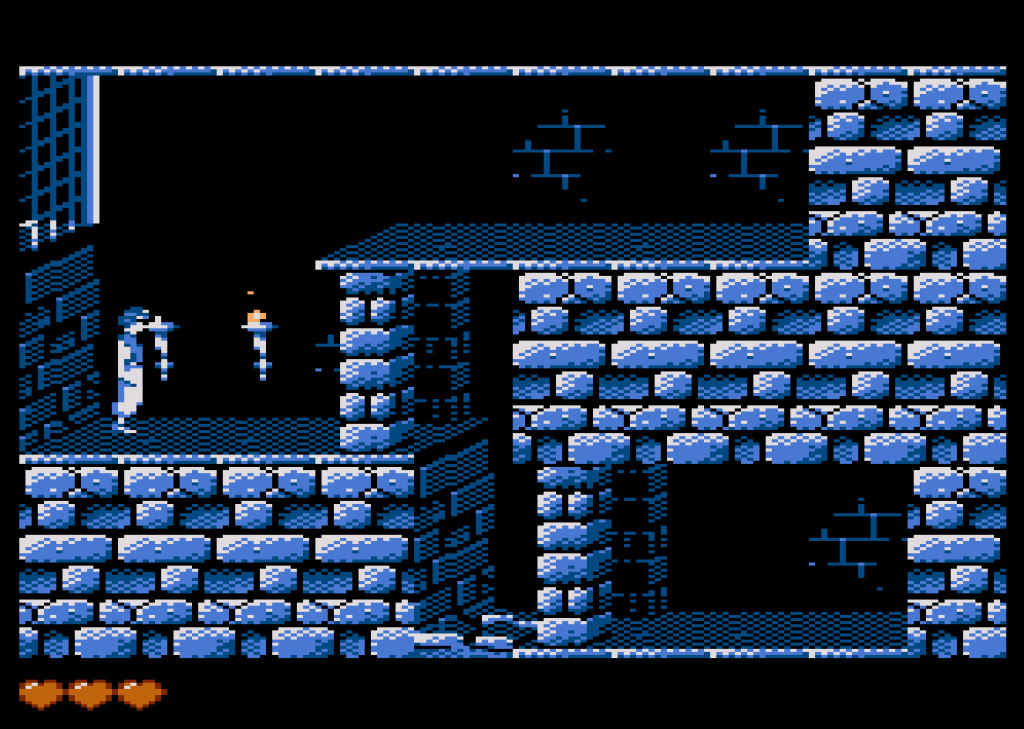
The old game "Prince of Persia" was made by the language called "Assembly," I can't even imagine how hard that was and how rewarding it was when the programmer completed it.

Source:  https://www.vintageisthenewold.com/port-of-prince-of-persia-on-atari-xl-xe-first-playable-level-released


'CS Knowledge' 카테고리의 다른 글

[UPenn] Expressing and Analyzing Algorithms  (0) 2022.09.12
[UPenn] Computational Thinking for Problem Solving  (0) 2022.09.08
Network: IP address and DNS  (0) 2022.09.05

The IP address was first designed in the 1970s when the population of Earth was 4 billion, so there are about 4.2 billion IP addresses that can be made. The number of people now is over 7 billion, which IPv4 lacks to distribute all the addresses to everyone on Earth. As an alternative, there has been IPv6 that has 16 bits in each octet instead of 8. Moreover, It can make an almost infinite number of IP addresses, so now, we don't have to worry.

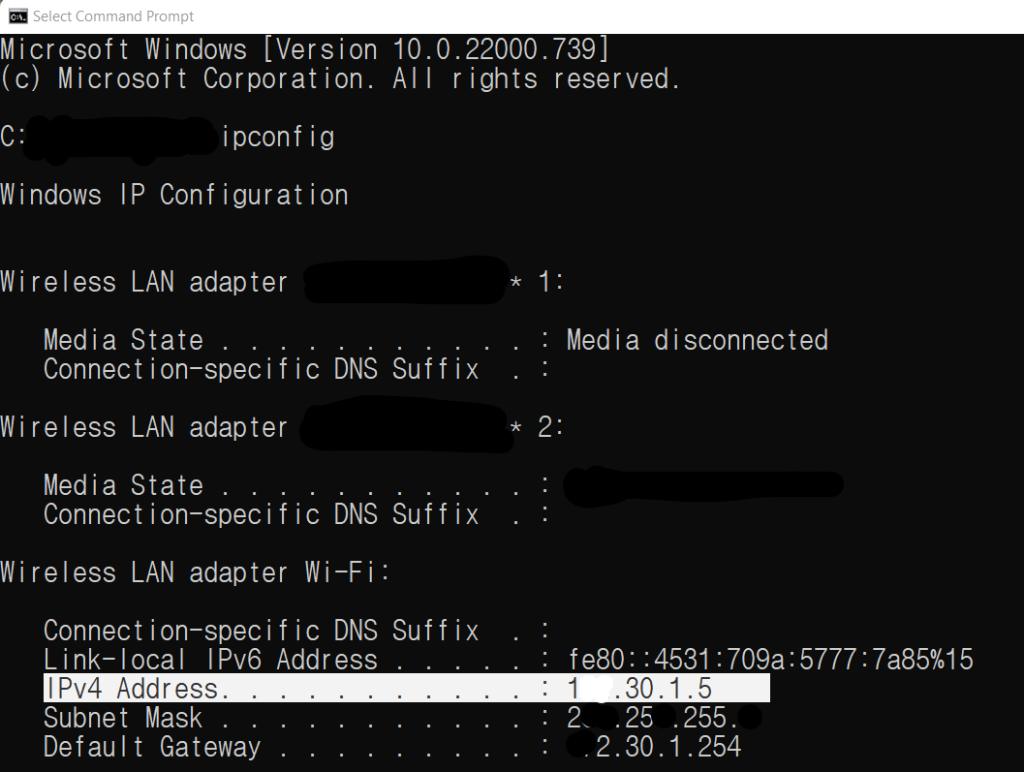
To see your IP address, you could enter 'ipconfig' on Command Prompt.

Ip address is designated based on your location. It has xxx.xxx.xxx.xxx format, and each 'xxx' is called "Octet" since each octet is filled with 8 bits(in total 32 bits.).

The IP address consists of numbers that are very hard to remember. We would instead remember 'Domain Names', which are easier to remember because they are in 'Human languages'. This system is called 'DNS(Domain Name System)'. If you want to know the IP address of a particular domain, you will use the keyword of 'ping' on the Command Prompt.

To inspect, the system sends 4 packets to the website to see if the server works well. Some servers block people from seeing their IP addresses. Moreover, we can just copy the IP address and paste it into the address bar to enter the same website.

To connect server and client, you need to know 1)the IP address of the server and 2)the number of the port. Following is a table of relatively well-known port numbers.

Port No. Description
21 ftp(File Transfer Protocol)
22 ssh(Secure Socket Shell)
23 telnet(Teletype Network Protocol)
80 http(Hypertext Transfer Protocol) : Usually omitted.
25 smtp(Simple Mail Transfer Port)
110 pop3(Post Office Protocol 3)

'CS Knowledge' 카테고리의 다른 글

[UPenn] Expressing and Analyzing Algorithms  (0) 2022.09.12
[UPenn] Computational Thinking for Problem Solving  (0) 2022.09.08
Fetch! Decode! Execute!  (0) 2022.09.07

+ Recent posts